It’s April!! The weather is getting so nice where I live and it’s making me so excited for gardening and spring showers and flowers and fruit and ugh everything hehe! Today it was so nice that I had to do some spring crafts! I put together three DIY’s that are so simple and cheap to do 🙂
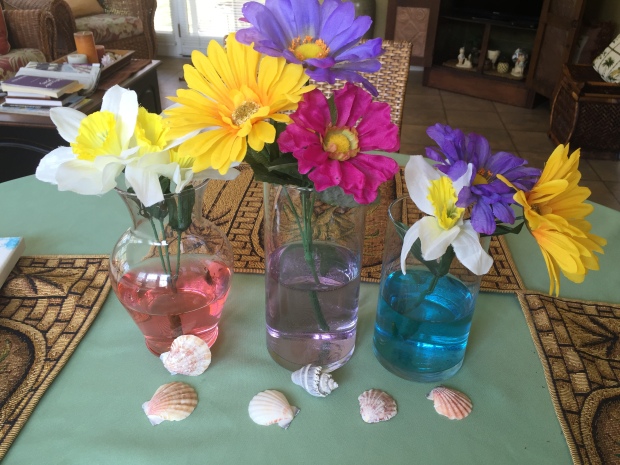
This first DIY is super simple! All you need is a vase, flowers (fake or real), and food coloring! You literally just put the flowers in a vase, add water, and put the food coloring of choice into the water 🙂 I think it adds such a pretty touch to your desk or kitchen table! Multiple vases put together make it so pretty and Tumblr!!

This DIY is more summery, but I just couldn’t wait!! You need a mason jar, sharpies, mod podge, and paint. For the first one I just wrote “aloha” in sharpie and painted the “o” as a flower. Once it’s dry, you cover the mason jar in mod podge with a paint brush. After doing this, you put the mason jar in the oven at 350 degrees F for 30 minutes. This step makes the sharpie and paint not wash off when you put it in the dishwasher. On the second mason jar, I just painted the bottom with any light color. You sprinkle glitter on it while it is still wet, so it will stick. Then paint the rest of the jar with your color of choice. These mason jars are so cute for decorations or to put your summer/spring drink in 🙂 In LOVE with my aloha one. I know I’m going to use it all summer!!

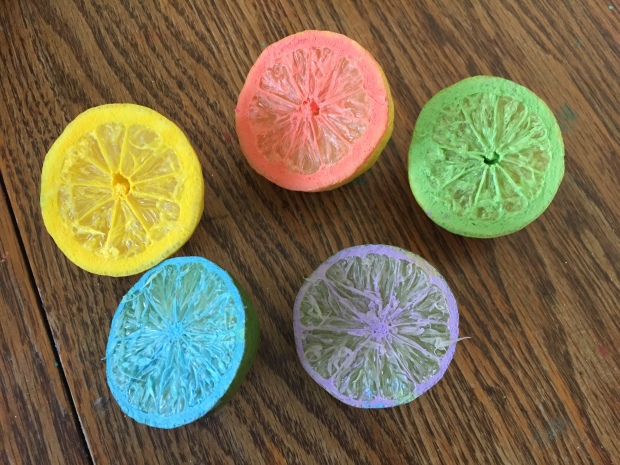 This last DIY was so much fun to make and so simple! All you need is a canvas, paint, and different sizes of lemon and/or lime. Before I started I cut the fruit in half and used a paper towel to suck up most of the juice from the fruits. After doing this, I put different colors of paint into different paper bowls. Using a PAINT BRUSH, I put the paint on the fruit slices. You want to make sure you use a paint brush to put the paint on because if you just dip the fruit in the paint, it will get too clumpy and you won’t be able to see the outline of the fruit on your canvas! Now you just stamp the painted fruit all over your canvas anywhere you want! This turned out so cute and it’s already hanging up in my kitchen 🙂 I love!
I hope you like these DIYs and you give them a shot yourself! If you do please feel free to tag me in them because I would love to see them!! 🙂 Thank you for reading lovelies and I will be back with a post next week!! ❤ LOVE YOU!
-Mae

Love this!! I have been in a DIY mood lately and these are so inspiring!
LikeLiked by 1 person
Thanks so much girl! 🙂 they were so much fun to make!! If you try them, please show me 🙂 I love it!!!
LikeLiked by 1 person
Yes, I will for sure. (:
LikeLiked by 1 person
These DIYs look AWESOME girl!! Have to try 🙂 great post
LikeLiked by 1 person
Omg thank you so much!! 🙂 it means a lot!!!
LikeLiked by 1 person
Your welcome!! xo
LikeLike
Awesome and simple. I like! 👍
LikeLiked by 1 person
Thank you so so much!!:)
LikeLike
Thanks for the recent like on my spring lipstick post! Love your blog and this diy 🙂 Follow for follow?
LikeLiked by 1 person
Thank you so so much lovely ❤ yes of course!
LikeLike
Love this!! Great DIYs, perfect for spring!! ❤ xx
LikeLiked by 1 person
Thank you so so much!! 🙂 I know right! I thought it was so fun and so cute 🙂 hehe thanks for reading girl!
LikeLiked by 1 person
Beautiful post! x
http://www.literallynataly.com
LikeLiked by 1 person
Thank you so so much girl! 🙂 xx
LikeLiked by 1 person
So adorable! Thanks for sharing, definitely gonna try this!
LikeLiked by 1 person
Thank you so so much!!! 🙂 show me when you’re done! They’re so cheap and easy 🙂 I had so much fun making them!!!
LikeLiked by 1 person
Love this idea!
LikeLiked by 1 person
Thank you so much!! 🙂
LikeLiked by 1 person
I’ve just nominated you for the Liebster Award!! Go check it out at https://stargirl150.wordpress.com/2016/04/22/the-liebster-award/
LikeLike